


Y'all come on in. Yes, that is truly how a Texan welcomes you to their home! Although the TV show Dallas put a lot of attention on our City in the 80's, there is a lot about that show that is not really Dallas.
We don't all wear Cowboy boots, or Cowboy hats. We don't all have an interest in oil and certainly don't all have a ranch!
But, it also brought to the attention that Dallas could have style. Not just in the way that people dressed, but in their homes.
The 80's brought Texans to attention and we have continued to embraced our homes and demanded that homes have style, details and a sense of comfort for our families. A place to easily entertain. We love to host a party! We like our brick and stone. We want a mix of materials to keep things interesting.

I've been fortunate to live in many different cities and states over the years. Including Tampa, Denver, Atlanta and at least 4 different cities in Texas. I am always surprised at how Texas homes and buyers are more demanding in what they want. Other homes in other states are often dated, boring and priced at much higher price than the homes in Texas. HGTV has brought attention to stylish homes and the value of a good design to the World. So y'all the gap is closing! We now see the value of a beautiful home, maintaining our investment, and keeping things current.
All that to say, come on in y'all and take a look around....let's step inside. I love how you can quickly see all the main areas of my home when you enter the front door.

Welcome to my living room...I'm not all white sofa's and chairs over here. I do love that look, but, it's just not practical in my world. I have pets, kids and since we move a lot because of my husbands job, I need durable. Pieces that will hold up well and look great in many different scenarios. So I choose my neutrals in darker colors, leathers, chenille's, dark wood...
I am also a big fan of dark wood floors. As time marches on I also tend to become more aware of our environment, so, when we move to a home and it needs an update I look for low VOC and sustainable materials. I can't always afford them, but, I look for the best option in my price range. There are many ways you can update and be respectful of our Earth. With that said. Wood floors are an investment for any size home. So, I want them to look great, add character and warmth to a home. Mine are NOT hard wood in this case! I chose Cali Bamboo floors, they met all the requirements. LOVE them! I chose the Distressed Java 5" 5/16 width. They are a nice medium color that lend themselves as a great backdrop to many different styles and colors. They have a 50 year warranty, are equal to hard wood floors and look and feel great.


and no we really don't have many reasons to light a fire but we love to decorate a mantle and make things cozy in the winter time. I like plenty of room to stretch out with a good book or have my 4 kids and their friends over. So I chose two complimentary sofas and a big over sized chair for this room. Our home is open. The previous owner loved dark colors. Possibly a left over to the late 90's Tuscan themes. Those colors just were not me. I knew I wanted the home to feel light, bright and comfortable. We got rid of the light brown ceilings and painted them crisp and white. I know not everyone likes a white ceiling but I like light to flow through my home, a white ceiling allows natural light as well as lamp light to flow easily from one space to another.
From our living room we can easily walk into the breakfast room and kitchen. Pull out a chair and sit for awhile with a glass of ice tea. Yes, y'all it is sweet and cold! I'm a bit traditional, I bought my first antique piece when I was 16 years old from the money I earned at my first job. It was a lovely piece from a local estate sale. My friends thought I was crazy. LOL. I love old wood and the history of a beautiful piece of furniture. My kitchen table is Tiger Oak and was hand made in France by my husbands great, great grandfather. They brought it with them to America. I love that we have the documentation and history of this table. The Antique ice box was my grandfathers. It was in the house he grew up in. Covered in a hundred layers of paint, he was using it to store dog food for his hunting dogs when I spied it and bartered him out of it! The new containers for dog food and the hours helping him at the dog kennel where he raised his Walkers and Beagles was worth it. The bonus was my momma spending the rest of the summer helping me strip it and bring it back to life. I refinished it in 1985 and it still looks beautiful today. I love the pieces and the memories they bring.

Another thing that is important to me in a home is LIGHT! Good lighting is so important. When we bought this house there was a single bulb fixture in every room and/or a ceiling fan single light in the bedrooms and living room. It was dark. I added the can lights in the living room, kitchen, and Master bedroom and upstairs game room. I also added under cabinet lighting, the two birdhouse style pendants over my kitchen island. I love lamps too. I want to be able to see to do a project with these old eyes of mine or turn things down and cozy up with soft lights and snuggle with my honey.

Do you spy my corbels? I have lugged these around to the last 4 houses I've owned. I bought them on clearance and knew they were perfect for a project...I just didn't know it was going to take me so long to find the right project! HAHA...my husband shakes his head when I bring these things home. I love how such a simple detail draws your attention to this bar area. I also chose to have my counter increased from the measly 12" it was so that you could really sit and eat or lay out a buffet! I don't know why builders always make the bar area more like a shelf than a place to actually sit and eat?!

The tile floors were original to the home. I like to choose my battles and expenses! Like I said we move often and this home might be a 2 year, 5 year or forever home. We will see. The floors were in good shape, no broken tiles and although I prefer something a little more modern and lighter, they worked well with all the choices I made for the home. So they stay.


I love white kitchen cabinets! I love that the look and feel clean. Love that they stand the test of time and it's so fun to decorate with such a bright backdrop. My counters are a leather finish of Quartzite in Fantasy Brown. Y'all, I LOVE my counter tops! I would have loved anything that was the green with pink flecked laminate that was there previously but when I saw this stone I knew that was it. It holds up in the kitchen. We cook a lot. We have 6-7 people busy in this kitchen at times, so spills and messes happen. With a simple wipe all is forgiven. They are beautiful in every light. I wanted to do a butcher block counter top for a long time. I decided this was my opportunity to shake things up and install a warm piece of butcher block on my kitchen island. It's been great. I sealed it with Watco Waterlox sealer. It is been in for over a year now and has warmed up even more but handles the day to day abuse my family throws at it.
Come on over to my dinning room. This is where our family eats 50% of our meals. We eat breakfast and lunch mostly in our breakfast room. But, we have an extra mouth or two on most nights so we usually wind up in the dinning room.

This room used to have a door coming from the kitchen and a door to the office. The doors hit each other and limited the space you could use for your table and chairs. I removed the door from the kitchen because I knew it would never be closed and just was in the way. I also removed the door to our office and added a barn door there. I wanted something that was interesting to look at and wouldn't cause a disruption to the flow of the room. My barn door is new. Yep, it is a simple pine shaker door. I bought the barn door hardware and installed it. I then took my new door and debated about a minute with painting it white or a pop of color. I then decided I really wanted an old door but y'all they are crazy expensive in Texas! A good reclaimed barn door can run from $800 on up and they don't last long. You have to be willing to buy them on the spot. So, I took nails, chains, screws and hammer and went to work beating up my "new" barn door. My dad wondered several times why I was beating up a perfectly good door. I then took 3 colors of Minwax stain, walnut, honey and classic black. I love how the door turned out. It works for me and I don't have to worry about it getting scuffed, a dog rubbing against it or children slamming it. The more dings the better.
Speaking of offices, let me show you ours. It is tucked behind that door and works perfectly for a place to work outside of the hustle and bustle of our home.
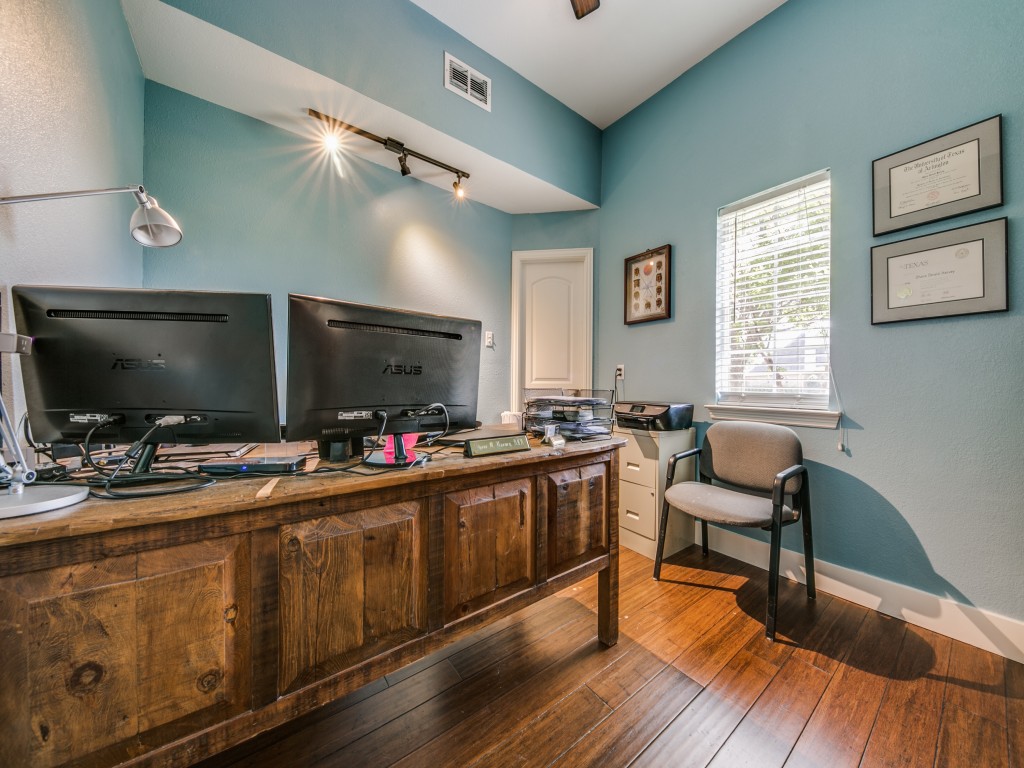
My husband offices from home so this space is used everyday by one or both of us. I chose a color that would be stimulating but still relaxing. This is SW #9057 Aquitaine. It is a lovely blue gray with just a slight green undertone. We also decided while we were doing the work we would add 6" baseboards to this house. Do you like large baseboards or do you prefer you baseboards to be smaller? I really like the beefy baseboards. I recently had the honor of restoring my childhood home. I realized that the original baseboards in that home from 1940 were 5". I guess that is why I always prefer them larger. It's what I was used to seeing.
Speaking of color. You probably noticed that the rest of my home, accept this office and my daughters bathroom are all the same color. I do like to use a "whole" house color. It creates a nice backdrop for your home and allows you to choose colors or trends by incorporating them into your furnishings and window treatments. I chose SW #7036 Accessible Beige for my home. It is a Greige not a gray. I tend to like a little more warmth in my home. I had it lightened by 25% for the majority of my home. I used it at regular tint for my media room and upstairs bathroom and carried the color across the ceiling in my upstairs rooms. I wanted to carry out the "media" room feeling of a little darker and cozy space.
Let's run on upstairs and look at that space before we head back down to see the bedrooms and baths downstairs.

Here you can really see the way our Cali Bamboo floors have such a rich color variation and you can see the character of the distressed wood. We use this space for family movie night, to work out and hang out. In a pinch we can add the air mattress and have a fully guest suite for our out of town visitors. This space really is the definition of flex space.

Our bathroom is perfect for this space. The plumbing was here but the space was left incomplete. So we enclosed the space with walls, added a shower and created the perfect 3/4 bath for our needs. Through those double doors is a fabulous 6' X 11' Storage closet!

Let's head back down and we will wrap this tour up with a view of our bedrooms and other bathrooms.
First we will peek into my teens room and the bathroom that she uses daily and also supports most of our guests.

We have fairly generous rooms in this home. The secondary bedrooms are 12' X 13'. That allows our daughter to have her desk in her bedroom. She likes that she can use it as a vanity space as well. Since we chose a whole house color I asked her to work with me and not against me. You know what I mean. At first she was bummed and wanted to really make this room her own. So we started discussing ways to do that. She found these fun gold circles by Wallpop and added them to her room. She then found the cute jewelry holder shaped like a dress form at a local garage sale! Yep, she is her mother's daughter. Shhh...she likes to pretend otherwise! Her bedding was where she could really bring in her favorite colors and patterns. All in all she loves her room and I'm happy that it is easily to transform with her as she continues to grow and her taste change. The other fun little update we did for this room was add the cute flower shaped fan. Isn't it fun?

She loved the Aquitaine color we used for the office so we chose that for her bathroom. She thought it was meant to be when a shopping trip to Target turned up this gold polka dotted shower curtain. So fun. You can't really see her beautiful quartz counter tops in this picture but she chose Calacatta Classique for her vanity top. I was able to find it as a remnant at the stone yard so the savings allowed us to add this higher priced material to her space.

And if our guests want to stay on the main level we have a room just for that....be our guest.

This room is a generous size, again it is 12' X 13', but I wanted to use a queen size bed for our guests. that proved challenging with the way the room was designed and where the doors and closet were. I usually don't like to put a bed in front of a window, but in this case, it truly was my only option. I ended up using my traditional canopy bed. framing the window as the back drop of the bed.

Now if you'll walk across the house with me I will share my Master suite with you....when you step in from our hallway this is what you see. Again, I love how open the house is.

Marble tile in a warm beige/gold color make this room feel inviting. I liked adding the modern vessel sinks to mix it up and keep it a little more interesting. Do you like to mix old and new? It keeps people on their toes.

My husband is just over 6'2" so I raised his vanity slightly and he loves not having to stoop to use his sink.

Again, I love my floors!! Never tire of feeling the smooth finish under my feet or enjoying the beauty of them. I don't use a lot of area rugs. I have in some homes but I don't want to hide the beauty of these floors. Yes, my 130 lb. Great Pyrenees is indoors most of the time, especially in the summer. The floors are so durable they don't get marked up at all by her big paws and claws! Now that is something to like.

This room is where my husband and I unwind. We like to read, watch a little news, chat and catch up. Of course we also sleep here. ;) We've often had a very small Master bedroom. Not every home allows so much square footage to be in a bedroom. I love that this really feels like a Master Suite. We have room for our necessities and a sitting area. My pink lamps are my "girly, girl" item in this space. My husband doesn't like a lot of frills, so I keep the room comfortable for him and add the lamps for me! I've also heard padded headboards are OUT, people! Can you believe it? Well, I'm hanging on to mine for awhile. I love to sit against it. I often wonder why I didn't have one sooner. This one is 6 years old but is still in great shape. COMFY! In my book that is worth keeping awhile longer. Do you listen to all the in's and out's of design. Since I design spaces for clients, I do keep up with them, but, like I tell my clients, your home is your home! It has to work for you and feel comfortable for you.

Having pieces that make you smile or feel comfortable to you are part of making your house become your home. If you invest in good quality pieces you can have those for a lifetime. My canopy bed is 25 years old and the night stands still by my bed today are from that set. They are in perfect condition so I don't feel the need to replace them and I like the size function they lend to my space. Again, use what you love in your home.
Now, if your not afraid of a little Texas heat, let's step through my bedroom door and take a look at the back patio.

This is where we kick off our shoes and chill during the hot days of summer. I recognize that a pool is a luxury and we didn't always have one. This is a sport pool (only 5' deep in the center) just big enough to swim a little, play some water volleyball or get cooled off. We also have a hot tub to warm up and relax those tired muscles in the winter.

Do you spy my little pool cabana? I'll write a post on it soon. I love it. However, my HOA does not. We have neighbors that have heavy plastic lawn sheds and several play houses. One play house is 8' tall! But, my little pool cabana is frowned upon. So, I'm not sure how much longer it will be here. But, it is a fun little spot. I can't wait to show it to you and let you see how we created a little hang out space for teen or adults alike.

Well, thank y'all. It was so nice to spend time with you and have you take a look around. I hope you enjoyed your time here. Come back anytime. I'm not Motel 6, but, chances are I'll have a light on.




 Posts
Posts

